It’s cold outside making it the perfect time of year to hit the snooze button an extra time (or two) to avoid leaving your warm bed in the mornings. A beautiful bed makes it even more fun! The above headboard was constructed using reclaimed wood and two sconces from Pottery Barn. For additional inspiration, check out the following post and pictures from Houzz:
Category Archives: DIY
DIY Decorating Horror Stories

Photo via Cracked.com.
Halloween is fast approaching and everyone loves a good horror story. But this year we’re not talking ghost tales or Freddy Krueger. Instead, we’re focusing on DIY design horror stories! Here are a few from readers that will make your hair stand on end:

Via Gif Bin.
Colleen:
The bedroom in my first off-campus apartment in college was tiny. To save space, I decided to purchase a loft bed so that I could place my desk underneath. My sole task was to measure the room. I don’t remember if I actually measured the room, or perhaps I didn’t do it correctly. I guess I thought all ceilings were pretty much the same height. After a trip to Ikea, my mom and I returned to my apartment to set up the furniture. We put together the bed, which was no easy feat, only to find that the mattress was approximately an inch from the ceiling. There was no way I could fit up there.
Ikea didn’t allow returns for this particular piece and we were stuck. My mom is extremely handy so we sawed a few inches off of the legs. The final product was wobbly and I have an irrational fear of heights. It wasn’t a good combination. I tried to sleep up there but eventually gave in, bought a futon, and squeezed it into the space. I slept on the futon for my remaining two years of college.
Lindsey:
My mother created a drop ceiling using plain white tiles. She wanted the tiles to have texture so she removed them and painted them using a thick texture paint. When she put the tiles back in place, she discovered the paint had added too much weight and part of the ceiling came crashing down.
Jenn:
A few years ago I moved into an older house. The baseboards and trim in the bedroom looked a little dingy. I didn’t have much experience with painting at the time and didn’t use a primer as I was simply painting white over white. When I was finished, the room looked refreshed and I was happy. However, I was unaware that the previous owners had used oil paint. My latex paint apparently didn’t adhere properly and the paint started peeling. My hard work went right down the drain. Eventually I called in a professional.
For even more DIY horror stories check out the hilarious blog Pinstrosity, which chronicles failed attempts at recreating DIY projects found on Pinterest. Here’s an excellent example from one of their posts:
The Original Pin:

Photo and tutorial via Hostess with the Mostess Blog.
The Finished Project:

Photo via Pinstrosity.
Have you experienced any DIY disasters?
Feel free to contact me if you’d like to remedy any mistakes or avoid decorating disasters altogether!
Renew Old Furniture with Color
Today we have a guest post from Jennifer Lutz of the Christmas Tree Market. Enjoy!
A pop of color is a great way to give old furniture a fresh, new look. There are many reasons, sentimental or practical, why I hold on to old furniture. It could be a hand-me-down from a loved one, a keepsake from an important time of our lives, or simply a sturdy piece that still works well. While old furniture may appear a bit shabby or outdated, sometimes you only need to scratch beyond the surface to discover a real gem underneath. Painting old fixtures with bright, bold colors is easy and the results can be stunning. Making full use of a reliable piece of furniture not only saves you money, but also gives you a fascinating makeover tale to share with friends.
Dresser:

Photo via Natty by Design.
Breathe new life to a well-used dresser with a fresh coat of paint to give it some character and style. A painted dresser catches the eye and gives a room a friendly, welcoming ambiance. Natty by Design recently transformed a humdrum brown dresser into a dramatic piece.
Start off by wiping the dresser with a dry rag, then cleaning it with mild soap and water. Lay down some used paper or a drop cloth underneath it. Use fine sandpaper to smooth out rough spots. Lightly sanding the surface or applying a coat of primer allows new paint to stick better. Remove or cover any hardware or parts you don’t want painted. When the primer has dried, use a paint or foam brush to apply the first coat of paint. Apply the second coating after a couple hours or when the first coat is already dry. Feel free to replace old knobs with ones that you like.
Chairs:

Photo via BHG.com.
A chair that has lost its original luster can be revamped with a simple coat of paint. Debra Wittrup of BHG shows how a spray of bright paint gives an old chair a bright, cheery look. If you want something more in line with spring, you can pair the chair with a colorful patterned cushion.
Helpful Tip! Glossy paint tends to highlight imperfections in furniture much more than matte. For a smoother finish, try dipping 400-grit sandpaper in water and sanding between coats.
Chest of Drawers:

Photo via Norske Interior Blogger.
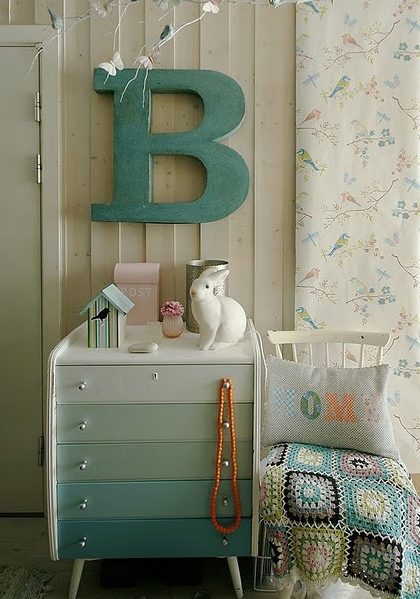
Furniture from the 50’s and 60’s have gorgeous clean lines that give them a timeless appeal. Transport mid-century fixtures into the future by painting them in various shades of a single color. A chest of drawers with a color gradient is an irresistibly cute piece that’s perfect for your little one’s room.
Helpful Tip! Painting the top of a piece of furniture requires extra care. What I do is work my way up from the legs first. I also use a roller for a smooth, even finish. To prevent sticking or unsightly marks, give your newly painted table top sufficient time to dry before placing objects on it.
Changing Table:

Photo via Lemon Drop Life.
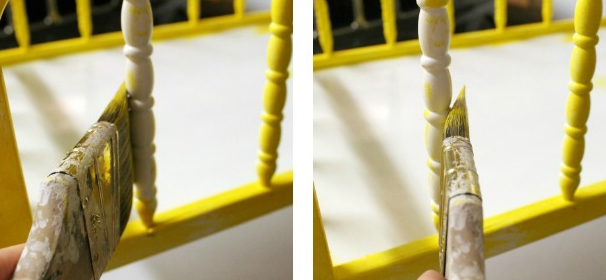
Most of the time, we have pieces of furniture that are still in great shape but not really much to look at. Dacia of Lemon Drop Life transformed a drab changing table into a bright ray of sunshine in the nursery by sanding it down and painting it a happy yellow shade.
Helpful Tip! To keep a painted surface pretty, I coat it with a water-based lacquer finish to protect against stains, marring, and fingerprints.
Buffet Table:

Photo via Funcycled.
Spare that poor forgotten buffet table a trip to the landfill. With a little elbow grease, Sarah from Funcycled turned a simple little hutch into a bright, beautiful addition to the dining room.
Incorporate her idea into your favorite buffet table that has seen better days by painting it a bold color that lets it stand out. Subtle distressed edges liven up the look even more.
Helpful Tip! Achieve the distressed look on paint quickly and easily by lightly sanding the edges and corners of your furniture with fine sandpaper.
Using bright colors to renew furniture can be fun and the results can be so rewarding. Show off your creativity while saving some cash with these inspiring DIY projects.
Jennifer Lutz blogs about home decorating at the Christmas Tree Market blog. The blog is part of Christmas Tree Market where you can choose an artificial Christmas Tree to suit your home décor.
My New Paint Touch-Up Kit
I love being organized – it can save so much time if your are able to achieve it! Pinterest is a great source for organizing and DIY tips, and one day when I have too much time, I will test and implement everyone of those fantastic ideas!
One idea I just recently came up with is to create a paint-touch-up-kit for my clients. I had been searching for the perfect containers for a while until I realized that small mason jars will do just fine. With the help of round Avery labels each jar was quickly and easily labelled.
I kept the jars in the cardboard case they came in which made it is to carry the whole “kit”.
Lessons learned? I had purchased mason jars with the 2 part lid. Next time I will buy jars with a full lid, I think that will work even better. Additionally I will keep looking for a nicer tray, but no such luck so far…
My Top 10 Decorating Tips
We all have our favorite go-to decorating principles. Here are some of our favorites:

By Envi Designs.

Photo via Heatherly Design.

Photo via Lizette Marie Interior Design.
4). Think of accessories as the perfect pair of shoes to go with your favorite outfit.

Photo from Lonny Mag via Haus and Home.

Via the Virginia Belle.

Via Abigail Ahern.
8). Mix old and new.

Photo via Emily Chalmers.
9). Don’t be afraid to combine styles.

Photo via Houzz.
10) Be unique, but skip the “themes” unless you are working for the Rainforest Cafe!

Photo via Houzz via Decorate: 1,000 Design Ideas for Every Room in Your Home by Holly Becker and Joanna Copestick.
What are your top decorating tips that you are willing to share?
Inspired by Herringbone and Chevron
Herringbone and chevron are two patterns that have resurfaced and taken the world of interiors by storm. Both add depth and interest to a space, whether they are used in flooring, fabrics, wallpaper, or even art. While they look very similar, there is a difference. Herringbone has a break at reversal so that it resembles an interrupted zigzag. The rectangle arrangements are interlaced. Chevron, on the other hand, is a repeated pattern of inverted V shapes that seemingly connect along a straight line. Here’s a visual:

Picture compliments of Apartment Therapy.
Herringbone is often considered classic and chevron is sometimes classified as more modern. Though herringbone floors date back to the 1500s, chevron floors appeared shortly after in the 1600s. The trend has been revived and now the patterns grace all types of products and design. That’s it for the history lesson. Now on to the pictures.

via Christine Fife.
These herringbone floors complement the traditional space and give it depth.

via Iris Interiors.
Porcelain tiles arranged in a herringbone pattern look sleek when paired with a rustic bench. The pattern also adds some drama.

via House Beautiful.
Hand painted chevron gives white built-in bookcases personality.
An amazing blue and white chevron floor. It really pops against the white.

via Lonny Magazine.
A chevron fabric-covered inspiration board is the perfect accent for this eclectic office nook. Here’s a close-up:

Via Lonny Magazine.

via Veranda.
Mary McDonald used hand painted chevron floors to spruce up a formerly boring bathroom and make it current. The gray color of the floors matches a shade of gray in the marble.

via Croma Design Inc.
Modern kitchen with a breathtaking herringbone backsplash.
DIY project! The owners used tape to create the pattern and then painted.

via Coco + Kelley.
The herringbone napkins set the stage for a perfect place setting. The gold flatware gives the tailored pattern an elegant look.

via Nest Design Studios.
A bold chevron rug and orange accents keep the space from feeling too restrained.

via West Elm.
I love this unique use of pattern. The metal bed frame features herringbone openwork making it the perfect focal point for the room.
Which space is your favorite? Are you team herringbone or team chevron?
DIY Functional Art for Teenager
A 16-year-old was in desperate need of storage and organization for her collection of oversized earrings that are so popular right now. Not only are they too big for traditional jewelry boxes, but delicate materials such as feathers mean they are especially fragile.
The solution? An easy craft project to not only store the earrings, but put them on display and ensure they’re accessible.
Here is the breakdown:
1) We started with three inexpensive frames from Ikea (less than $10 per frame) to create a grouping.
2) Next, we purchased some decorative paper and mesh. We chose purple scrapbooking paper, but really any paper will do, including basic white. The paper and mesh are from Michaels, but a small amount of mesh, like window screen material, from the hardware store would work as well. Our mesh hailed from the wedding supplies aisle, so it is a little bit more decorative and features some shimmering strands.
 3) With all of the materials on hand, the assembly began. We placed the mesh on top of the paper, followed by the mat, and then the picture frame as shown here.
4) The only messy step was the process of gluing the mesh to the back of the mat. We used a combination of tape and craft glue. A hot glue gun probably would have been easier, but it wasn’t available at the moment. I also wondered, but did not try, if the mesh could be sewn to the paper as opposed to being attached to the mat? I will have to try that in the future. Once the glue was dry, the mesh was trimmed and the frame was assembled. The finished product:
The Difference Paint can make!
The guest room has been painted and I am very pleased with the results. We chose 2 grays; a lighter shade for the main walls and a deeper shade gray for the accent wall. The wide stripe carries over the light gray from the main walls with 2 thin silver stripes adding a little bit of glamour and luxury to the room.
As you can see the new headboard has been installed and the room is now ready to be styled with curtains, new bedding, and accessories. We are trying to decorate the room on a budget, so that requires a little bit of flexibility in the design, as well may take a little bit longer shopping, as we do not want to compromise on quality and design!
So stay tuned… More to follow!
DIY Headboard Makeover for less than $20
A guest room (see before picture below) that we are currently working on is receiving a new headboard. The old headboard featured nice tufting but was made with a very inexpensive muslin type fabric. We wanted a higher-end, cleaner and more modern look for the new guest room!
So what did we do? Follow our step-by-step instructions below:
Step 1 – Remove old headboard.
Step 2 – Purchase new fabric. Actually instead of buying yardage, we found a curtain panel at the Christmas Tree Store for $9.99 in the exact color that we were looking for. Since it was a thermal lined curtain panel it also had the right “weight” to be used for this upholstery project.
Step 3 – Lay out the fabric (face down), add a thin layer of padding, and place headboard on top, face down as well.
Step 4 – Start stapling! It’s best to use a helper for this to make sure that the fabric is evenly stretched in order to avoid any wrinkles and to make sure that the direction of the fabric and the headboard are the same.
Step 5 – We decided to add nail heads as well, which we purchased at Lowes.
Step 6 – Make sure the nail heads are evenly spaced and in a perfectly straight line. Our nail heads are 3/4″ apart. We measured first and marked each spot with a very fine black sharpie.
And enjoy your new head board! Want to see the finished bedroom? We will post pictures of the finished room in a few weeks!


